13 Mar Headshot Photography Tips: Lighting, Posing & Camera Secrets
Ever wondered why some headshots instantly grab attention while others feel flat and lifeless? The answer is simple: lack of proper headshot photography techniques.
Unlike casual portraits or selfies, headshots introduce you and your client before you say anything out loud; it’s a more professional image where first impression matters. Like great & lucrative product shots, headshots are also important to build your brand or your clients.
Considering those facts, we’ve come up with 10 actionable headshot photography tips packed with lighting, posing, and camera settings so you can nail it and create irresistible headshots like pros.
Understanding Headshot Photography
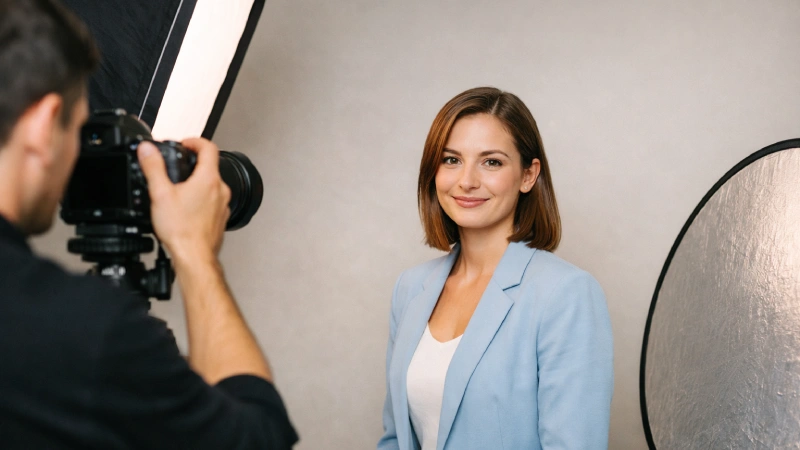
Headshot photography refers to a type of portrait photography focusing on a person’s face, head, expressions, and personality. Unlike full-body portraits, headshots present a clear, professional, and approachable image of the subject. These images are used for professional profiles, marketing materials, acting portfolios, corporate websites, and social media.
Professional headshot photographers utilize the best lighting, camera settings, posing, background, and approachable gestures, depending on individuals purpose. For example, LinkedIn profile photos often feature polished headshots that convey credibility and confidence.
In short, headshot photography is about capturing a person’s essence in a visually appealing, professional way, ideal for branding and personal marketing.
Essential Gears for Headshot Photography
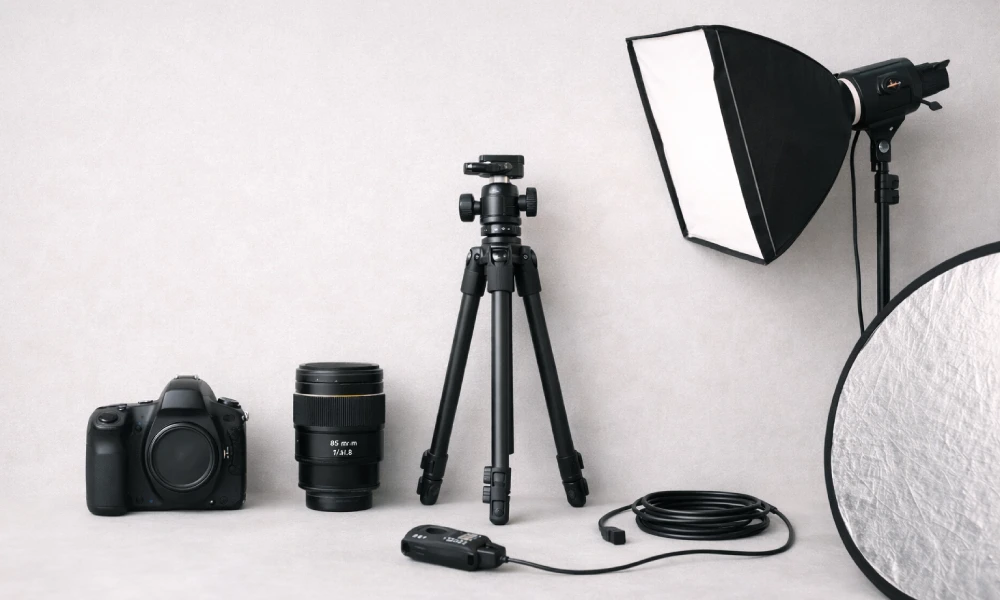
Creating a polished, professional headshot requires the right gear list, including:
1. Camera & Lens
The camera and lens are the heart of headshot photography. The lens you choose affects the headshot’s perspective and quality.
- Lens Choice: Portrait lenses between 85mm and 135mm are ideal. They provide flattering compression and reduce facial distortion. Also, wide apertures (f/1.8–f/2.8) help to produce a soft background blur (bokeh) that separates the subject from the background.
- Camera Type: Full-frame or APS-C DSLRs and mirrorless cameras are commonly used to capture sharp, high-resolution images.
A quality lens ensures crisp detail in the eyes, smooth background blur (bokeh), and professional-looking headshots.
2. Camera Body
A camera body is essential to ensure high-resolution, sharp, accurate-color images, especially when you use professional lenses (85mm-200mm). Other key reasons for a dedicated camera body:
- High-resolution sensors (20MP+) allow you to crop and retouch without losing detail.
- Fast and accurate autofocus helps you capture sharp expressions, even when the subject moves slightly.
- Fast shutter response and continuous shooting capability help you capture subtle changes in expression that make a headshot look natural.
3. Tripod
A tripod ensures stability, consistent framing, and sharper images, especially in studio setups. Professional photographers use a tripod or stabilizer to focus on posing and expression without worrying about camera shake. Also, this gear is essential for longer sessions, tethered shooting, or precise composition.
4. Light Modifiers & Diffusers
Modifiers help you to control the quality, direction, and softness of light. Softboxes, umbrellas, and diffusers produce soft, flattering light, reducing harsh shadows and highlights. Proper use of modifiers creates depth and dimension, making the headshot more professional.
5. Reflector
A reflector is a simple but powerful tool that bounces light back onto the subject, filling shadows under the eyes, chin, and cheeks. It is used in studio and outdoor headshots to soften harsh lighting. However, reflectors come in A reflector is a simple but powerful tool that bounces light back onto the subject, filling shadows under the eyes, chin, and cheeks.
6. Remote Shutter Release
A remote shutter release allows photographers to capture images without touching the camera, reducing shake and ensuring sharper results. Especially useful for tethered shooting or when the camera is on a tripod. Some wireless options also allow photographers to trigger multiple cameras simultaneously, useful in advanced setups.
7. Optional Accessories
These are not mandatory, but can improve your overall photography workflow and flexibility:
- Tethering Cables or Wireless Tethering: Preview images on a computer for immediate feedback.
- Light Stands & Boom Arms: For creative lighting angles or overhead lighting.
- Gels and Filters: To adjust light color or mood in creative headshots.
- Makeup & Grooming Kits: Useful for quick touch-ups during sessions.
Investing in quality gear doesn’t mean buying the most expensive equipment. It’s about choosing tools that provide control, consistency, and professional results.
Mastering Headshot Lighting
Lighting is the most crucial element in headshot photography. The right light highlights facial features, creates depth, and enhances the subject’s expression. So, to master headshot lighting, you should –
1. Understand the types of light
Headshot photographers often suggest using two main types of light:
Natural Light:
- Soft, diffused daylight (like near a north-facing window) creates a flattering, even glow.
- Avoid direct sunlight, which produces harsh shadows and highlights.
- Can be enhanced with reflectors to fill shadows and balance skin tones.
Artificial/Studio Light:
- Includes strobes, continuous LED panels, and softboxes.
- Provides complete control over intensity, direction, and quality, making it ideal for professional headshots.
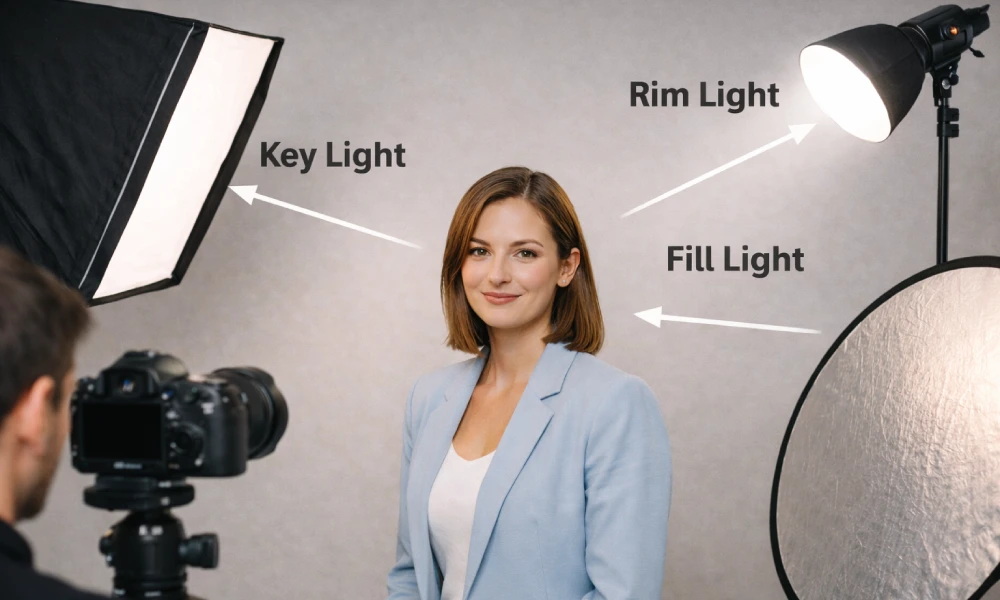
2. Light Positioning
Proper light placement shapes the subject’s face and sets the tone for the portrait. Common lighting techniques for headshots include:
Key Light (Main Light):
- Positioned at a 45-degree angle from the subject’s face and slightly above eye level.
- Creates natural shadows that add dimension.
Fill Light:
- Placed on the opposite side of the key light, usually at a lower intensity.
- Softens shadows without eliminating them, keeping the face balanced.
Rim or Hair Light:
- Positioned behind and slightly above the subject.
- It helps separate the subject from the background and adds a professional, polished look.
Camera Settings and Technical Considerations
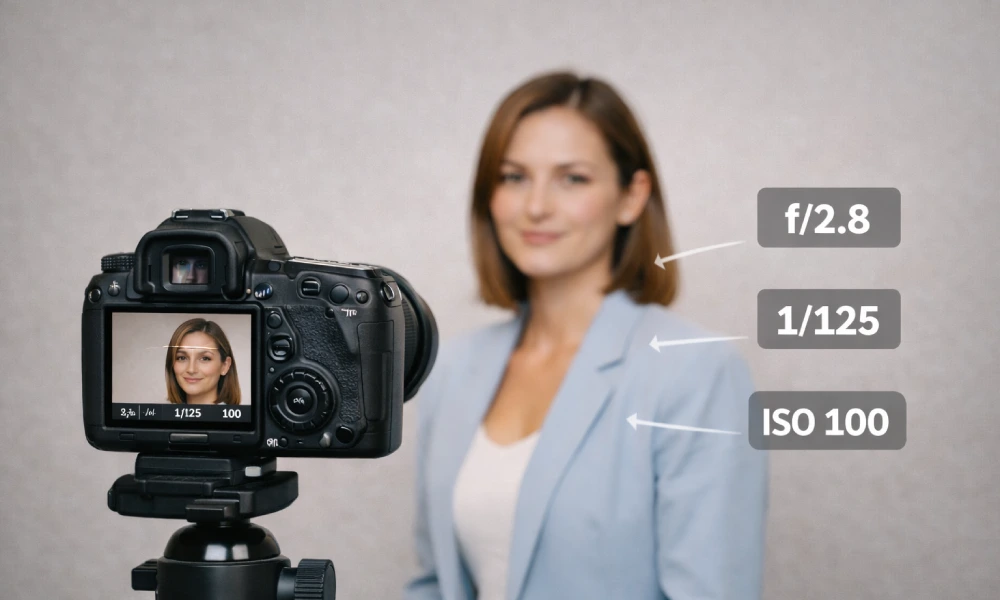
Proper camera settings are essential for capturing sharp, well-exposed, and flattering headshots. By controlling aperture, shutter speed, ISO, and focus, you can highlight the perfect and professional subject’s facial expressions in one frame.
1. Aperture
Aperture controls depth of field and background blur.
- Wider apertures (f/2.8–f/4) create soft, blurred backgrounds (bokeh), isolating the subject.
- Narrower apertures (f/5.6–f/8) keep the face and hair in sharper focus without flattening the image.
2. Shutter Speed
Shutter speed determines how motion is captured. A speed of 1/125s or faster is generally recommended to avoid motion blur, especially when the subject slightly moves during the session.
- Use faster speeds if the subject moves or shoot handheld.
- Use a tripod to avoid camera shake.
3. ISO
ISO controls the camera’s sensitivity to light. Keeping ISO low (100–400) ensures clean images with minimal noise, which is important because noise can be noticeable in skin tones.
4. White Balance
Accurate white balance helps maintain natural skin tones. Photographers often set white balance according to the lighting environment (daylight, flash, or custom settings) and fine-tune it during editing.
- Daylight (around 5000–5500K) for natural light.
- Flash or custom white balance for studio setups.
5. Focus Settings
Sharp focus on the subject’s eyes is critical in headshot photography. Using single-point autofocus or eye-detection autofocus helps ensure the eyes remain the sharpest part of the image.
Posing for Flattering Headshots

A slight tilt of the head, a subtle smile, or proper shoulder alignment can make the difference between an average and a professional, creative portrait photography. Proper posing for flattering headshots is discussed below:
1. Start with a relaxed posture
A relaxed posture helps the subject appear confident and comfortable in the photo. Ask the subject to stand or sit upright with their shoulders relaxed rather than stiff. Dropping the shoulders slightly and lengthening the neck creates a more flattering and natural appearance.
2. Angle the body slightly
Instead of facing the camera directly, ask the subject to turn their body slightly to the side while keeping the face toward the camera. This small adjustment adds depth and dimension, making the portrait look more dynamic and slimming.
3. Adjust the chin position
Chin placement can greatly affect how the jawline appears in a headshot. Encourage the subject to slightly extend the chin forward and then lower it slightly. This technique helps define the jawline and reduces the appearance of a double chin.
4. Focus on the Eyes
The eyes are the most expressive element in a headshot. Encourage the subject to maintain natural eye contact with the camera or slightly above the lens. A subtle squint, sometimes called a “smize,” can make the eyes look more confident and engaging.
5. Subtle head tilts
A slight tilt of the head can make a headshot look more natural and friendly. Small tilts to the left or right can also highlight facial symmetry and help photographers find the subject’s most flattering angle.
6. Relax the facial expression
Encourage genuine expressions rather than forced smiles. Engaging the subject in light conversation can help create authentic smiles and relaxed facial expressions, resulting in more natural and appealing headshots.
7. Manage hands & arms
If hands are visible in the frame, they should look relaxed and natural. Arms can be placed at the sides, lightly crossed, or gently resting near the body. Avoid stiff or tense arm positions that may distract from the face.
8. Mind the Angles
Avoid shooting from below, which can distort facial features and create unflattering shadows. Try to shoot slightly above eye level, or at the same level, which generally provides the most flattering perspective. Use your camera’s viewfinder or live view to fine-tune angles before shooting.
9. Capture Multiple Variations
Small pose adjustments can create very different results. Photographers often capture multiple variations of head tilt, expression, and shoulder angle to ensure the subject has several flattering options to choose from.
Wardrobe and Styling for Headshot Photography
The right clothing, colors, and grooming choices help keep the focus on the subject’s face and expression.
1. Choose Solid and Neutral Colors
Solid colors generally work best for headshots because they keep the focus on the subject’s face rather than the clothing.
- Neutral tones such as black, gray, navy, white, or beige create a clean and professional look.
- Avoid overly bright or neon colors, as they can reflect light onto the skin and alter natural skin tones.
- Simple color choices help maintain a timeless appearance that won’t look outdated.
2. Avoid Busy Patterns and Logos
Clothing with bold patterns, stripes, or logos can distract viewers and draw attention away from the subject’s face.
- Small patterns may also create visual distortions or moiré effects in photographs.
- Plain, simple clothing ensures that the subject remains the main focus of the image.
3. Select Well-Fitted Clothing
Properly fitted clothing makes a big difference in how polished the headshot appears.
- Clothes that are too tight or too loose can look unflattering on camera.
- Structured garments like blazers, collared shirts, or fitted tops help create a professional and confident look.
4. Consider Necklines and Layers
Necklines help frame the subject’s face and influence the overall composition of the headshot.
- V-necks can create a longer neck appearance and add elegance.
- Crew necks or collared shirts offer a classic, professional look.
- Adding layers like jackets or blazers can add depth and dimension to the portrait.
5. Keep Accessories Minimal
Accessories should complement the subject rather than overpower the image.
- Simple jewelry such as small earrings, a watch, or a subtle necklace works well.
- Avoid large or shiny accessories that may reflect light or distract viewers.
- Glasses can be worn if they are part of the subject’s everyday look, but reflections should be checked.
6. Grooming and Personal Styling
Perfect grooming ensures the subject looks polished and camera-ready.
- Hair should be neat and styled naturally.
- Makeup should enhance natural features rather than appear heavy or overly dramatic.
- Facial hair should be trimmed and well-maintained.
The best headshot wardrobe keeps the focus on the face and expression. Solid, well-fitting clothing in complementary colors with minimal accessories ensures your subject looks confident, professional, and camera-ready.
Headshot Photography Background and Composition
A well-chosen background combined with thoughtful composition ensures the portrait looks clean, professional, and visually balanced.
1. Choose a simple & clean Background
A clean background helps keep the viewer’s attention on the subject rather than distracting elements.
- Neutral colors like white, gray, beige, or black work well for professional headshots.
- Simple backgrounds create a polished look suitable for corporate profiles and professional branding.
- Avoid cluttered environments with objects or patterns that compete with the subject’s face.
2. Depth of field
Depth of field is key in separating the subject from the background.
- Shallow Depth of Field: Achieved with wider apertures (f/2.8–f/4) and longer lenses (85–135mm) to create a smooth, blurred background (bokeh), making the subject stand out.
- Depth of Field: Less common in headshots, but useful if the background provides context or branding (e.g., an office environment).
3. Composition Principles
A strong composition guides the viewer’s eye and enhances the subject’s presence:
- Rule of Thirds: Position the subject’s eyes along the top third of the frame for balanced visuals. Slightly offsetting the face from the center can create a natural and dynamic feel.
- Centered Composition: Works for formal corporate headshots where symmetry conveys professionalism and authority.
- Leading Lines & Framing: Use natural lines (like walls, doorways, or architectural elements) to draw attention toward the face.
4. Utilize Negative Space
Negative space refers to the space around the subject.
- It helps create a clean and minimalistic composition.
- It can also provide space for text or branding when the image is used in marketing materials.
5. Maintain Consistency for Multiple Headshots
When photographing a team or corporate group, consistency is important.
- Use the same background, lighting style, and framing for all subjects.
- This creates a cohesive and professional look for company websites and marketing materials.
The best headshot backgrounds are simple, clean, and complementary. On the contrary, an effective composition keeps the subject’s eyes and expression as the main focus.
10 Actionable Headshot Photography Tips
Capturing a professional headshot requires attention to both technical details and client interaction. Considering all these factors, we’ve listed ten actionable tips that ensure a smooth photography session.
Pre-session consultation
Communicating with your client before the shoot ensures that you understand their goals, style preferences, and intended use of the headshots.
- Discuss wardrobe, background preferences, and makeup/hair.
- Set expectations for posing, expressions, and the mood of the photos. Helps reduce anxiety and ensures the client feels prepared, resulting in more natural and confident expressions.
Tripod or assistant
Stability and consistency are key for sharp, professional results.
- A tripod eliminates camera shake, especially in low light or controlled studio setups.
- Having an assistant helps manage lighting, props, or reflectors, allowing you to focus on composition and client interaction.
- Ensures consistency when taking multiple shots or adjusting the background.
Shoot in RAW
RAW files preserve maximum image data, allowing more flexibility in post-processing.
- Enables adjustments to exposure, white balance, shadows, highlights, and color without degrading image quality.
- Ideal for professional headshots where precise skin tone correction and subtle retouching are required.
- RAW files provide higher-quality results compared to JPEGs, especially when printing or delivering high-resolution digital headshots.
Focus on the eyes
The eyes are the focal point of every headshot.
- Use single-point autofocus on the closest eye to the camera.
- Slight squinting or “smize” (smiling with the eyes) adds warmth and authenticity.
- Sharp eyes instantly make a portrait feel professional and engaging.
Background separation
Separating the subject from the background ensures the viewer’s attention remains on the face.
- Use a wide aperture (f/2.8–f/4) for soft background blur (bokeh).
- Add a hair or rim light to create separation from the background.
- Avoid backgrounds that clash with the subject’s clothing or skin tones.
Lighting control
Lighting shapes the face and defines the mood of the headshot.
- Use soft, directional light to avoid harsh shadows and unflattering highlights.
Key light + fill light + optional rim light creates a balanced and professional look. - Reflectors can fill shadows under the chin, eyes, or cheekbones to enhance features naturally.
Experiment with poses
Slight adjustments in posture and expression can dramatically improve the final shot.
- Try different head tilts, shoulder angles, and facial expressions.
- Encourage subtle movements between shots—leaning slightly forward or relaxing the jaw.
- Take multiple variations to give clients options for selecting their favorite look.
Camera height & angle
Proper camera positioning ensures a flattering perspective and proportion.
- Shoot at eye level or slightly above to avoid unflattering shadows under the chin.
- Avoid shooting from below, which can exaggerate the nose or double chin.
- Small adjustments in height or tilt can highlight the jawline, cheekbones, and eyes effectively.
Minimize distractions
Clean and uncluttered compositions keep the focus on the subject.
- Remove objects, wires, or reflections that draw attention away from the face.
- Keep the background neutral or blurred to prevent visual clutter.
- Simple clothing and minimal accessories also reduce distractions in the frame.
Subtle editing
Professional post-processing enhances the headshot without making it look artificial.
- Correct exposure, white balance, and color tones.
- Remove temporary blemishes, stray hairs, or minor distractions.
- Enhance eyes and sharpen key facial features while retaining natural skin texture.
All these top 10 headshot photography tips help you capture professional, polished, and flattering headshots. But your work isn’t done yet. To ensure fine-tuned and top-notch headshot photos, you must apply post-processing and photo editing techniques.
Curious, thinking about the benefits and the purpose of image post-production? Check out the next section for in-depth details.
Post-Processing & Editing for Perfect Headshots
The essential post-processing and editing processes that photographers must follow to create high-quality headshots are shared below:
1. Start with Lens Corrections
Start with lens corrections to fix common optical issues caused by the camera lens. Many lenses create slight distortion, vignetting, or chromatic aberration, which can affect image quality.
Use editing tools in software like Adobe Lightroom or Photoshop to enable lens profile corrections. This automatically removes barrel distortion, corrects color fringing around edges, and evens out dark corners. Another effective way is to outsource professional post-processing services from a reputable photo editing service provider.
2. Check for Reflections on Glasses
Reflections on eyeglasses are a common issue in headshot photography. Bright reflections from lights or windows can block the eyes and distract viewers.
During editing, carefully reduce glare using cloning or healing tools. Lowering highlights or selectively adjusting exposure can also help minimize reflections. However, avoid removing reflections completely if they look unnatural—subtle corrections work best while preserving the authenticity of the image.
3. Smooth Clothing Wrinkles
Wrinkled clothing can make a professional headshot look unpolished. Even if the clothing looked fine during the shoot, wrinkles may become more noticeable in high-resolution images.
Use tools like frequency separation, clone stamp, or healing brush to smooth minor wrinkles without affecting fabric texture. The goal is not to make clothing look flat but to reduce distracting folds that draw attention away from the face.
4. Remove Busy Background
A cluttered or distracting background can reduce the impact of a headshot. Objects like signs, furniture, or random colors can pull attention away from the subject.
Use content-aware fill, cloning tools, or masking to remove unwanted elements. Simplifying the background keeps the viewer’s focus on the person and helps create a cleaner, more professional image.
5. Remove or Change Background Color
Sometimes the original background color may not match the brand, company guidelines, or the subject’s clothing.
In post-processing, you can replace the background with a neutral color such as white, gray, or soft gradients. Using masking tools allows you to isolate the subject and change the background smoothly without affecting hair edges or details.
6. Add a Blurred Background.
If the background is slightly distracting but cannot be fully removed, adding a soft blur effect can help separate the subject from the background.
Use selective blur techniques to mimic shallow depth of field. This creates a natural portrait look and ensures the face remains the sharpest and most prominent element in the image.
7. Reduce Blemishes & Retouch Skin
Skin retouching is one of the most important steps in professional headshot editing. The goal is to remove temporary imperfections while preserving natural skin texture.
Use tools like the healing brush or spot removal to remove acne, dust, or small blemishes. Avoid excessive skin smoothing, which can make the subject look artificial. Professional headshots should still retain realistic pores and texture.
8. Correct Exposure & White Balance
Proper exposure and white balance in photography are essential for natural skin tones. Poor lighting during the shoot may cause images to appear too dark, too bright, or overly warm/cool.
Adjust exposure, highlights, shadows, and contrast to balance the image. Then fine-tune the white balance so skin tones look accurate and natural. This step greatly improves the overall visual quality of the headshot.
9. Crop for Strong Composition
Cropping helps improve the composition and framing of the headshot. Most professional headshots use a tight crop, focusing on the face and shoulders.
Follow common composition rules like placing the eyes near the upper third of the frame. Proper cropping removes unnecessary space and ensures the viewer’s attention goes directly to the subject.
10. Enhance the Eyes
The eyes are the most important focal point in a headshot. Subtle enhancement can make the portrait feel more engaging and professional.
Slightly increase sharpness, clarity, and brightness around the eyes. You can also enhance catchlights and reduce redness. These small adjustments make the eyes appear more vivid while still maintaining a natural look.
11. Export in the Right Format
The final step is exporting the image in the correct format and resolution, depending on its use.
- JPEG (high quality) – Best for websites, LinkedIn, and social media profiles
- PNG – Useful when transparency or background removal is required
- High-resolution files – Ideal for printing or marketing materials
Make sure to maintain proper resolution and color settings so the headshot remains sharp across different platforms.
Common Mistakes to Avoid
Some common headshot photography mistakes are as follows:
- Using harsh or unbalanced lighting: Strong shadows, uneven lighting, or poorly placed lights can create unflattering facial shadows and highlight skin imperfections. Try soft, well-balanced lighting for clean and professional headshots.
- Choosing a distracting background: Busy or cluttered backgrounds can take attention away from the subject’s face. Simple, neutral, or softly blurred backgrounds keep the focus on the person.
- Standing too close to the subject: Shooting too close with a wide lens can distort the subject’s facial features, making the nose appear larger or the face unnatural. Using a proper distance and portrait lens avoids distortion.
- Overposing the subject: Stiff or unnatural poses can make the headshot look awkward. Encourage the subject to maintain a relaxed posture and natural expressions for a more authentic look.
- Incorrect camera settings: Using the wrong aperture, ISO, or shutter speed may cause blurry images or poor exposure. Headshots usually work best with a moderate aperture (f/4 to f/8) and low ISO for sharp results.
- Ignoring facial angles and posture: Shooting straight-on without slight head tilts or body angles can make the image look flat. Small adjustments in chin position, shoulder angle, and posture add depth.
- Over-editing during post-processing: Excessive skin smoothing or heavy retouching can make the photo look artificial. Natural-looking edits maintain authenticity while enhancing the image.
Bonus Tips from Professionals
Here are some exceptional and must-followed bonus professional tips to fine-tune headshots and make them truly stand out at a professional level:
1. Keep Consistency Across a Set
When shooting multiple headshots for a company or portfolio, maintain consistent lighting, editing style, and color grading. This ensures a cohesive, professional look across all images. Minor tweaks in post-processing help maintain uniformity without looking repetitive.
2. Zoom in During Editing
Zoom in to 100% or higher while retouching to catch small imperfections that might not appear at first glance. Checking details like stray hairs, lint on clothing, or subtle reflections ensures the final image is flawless.
3. Deliver Multiple Versions
For clients, providing slightly varied versions of the headshot (different crops, background options, or minor expression changes) adds value. Also, it allows clients to upload images to social media, websites, or print without compromising quality.
Frequently Asked Questions About Headshot Photography
What lighting setup works best for professional headshot photography?
The best lighting setup for a professional headshot is soft, flattering, and creates subtle dimension. You can get this lighting with a single large softbox/umbrella combined with a reflector.
What lens is best for headshot photography?
The best lens for headshot photography is generally a medium telephoto prime lens between 85mm (f/1.4 or f/1.8) and 135mm on a full-frame camera to avoid facial distortion.
How do you make headshots look more professional and flattering?
To make headshots look more professional and flattering, use soft, diffused, natural light (or a softbox), position slightly above eye level, and so on. Also, you should utilize post-processing photo editing techniques.
What is the ideal distance between the camera and subjects for a headshot?
The ideal distance between the camera and subject for a headshot is generally 6 to 12 feet (appx 2-4 meters), ensuring flattering facial proportions and reducing distortion.
How can photographers help clients feel comfortable during a headshot session?
Photographers can make clients comfortable during headshot sessions by creating a relaxed and supportive environment. Start with a friendly conversation and explain the process (e.g., posing style) so clients act perfectly.
Conclusion
Ready for your headshot photography session? Before jumping into this photography genre, ensure you go through the 10 tips and other hacks. Headshots are an incredible medium to visually communicate subjects personality.
Good luck!