21 May Clipping path vs Image mask: What sets them apart?
Clipping path vs Image mask is a hot topic when it comes to which technique one must use to remove background or eliminate unwanted objects from their e-commerce product photos.
Are you one of those who are confused about which one would be the best fit for their image editing project? Then you have hit the right spot.
This article is a comprehensive Clipping path vs Image mask guide that discusses both the clipping path and image masking techniques in detail. Here you will learn what they are, their different types, their purpose of use, the benefits and drawbacks of using them, and a lot more.
So without further ado, let’s dive straight into our discussion.
What is Clipping Path?
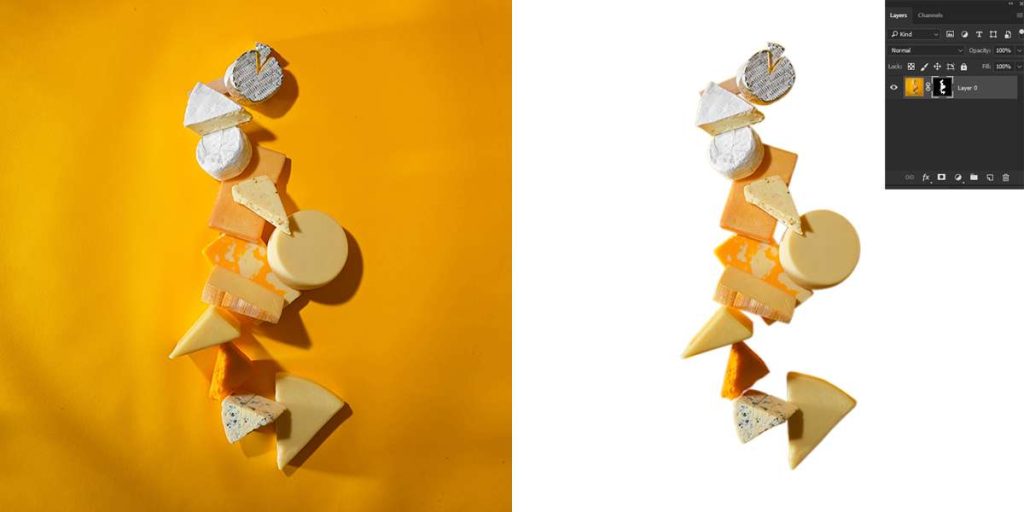
Clipping Path, also known as deep etching, is an image editing technique that separates a subject from its background. Usually, in Adobe Photoshop, the pen tool is used to create vector paths around the edges of a subject, shape, pattern, or element in a composition and isolate them from the background.
The clipping path service is most suitable for subjects or elements with hard or straightforward edges, for instance, packages, boxes, electronic appliances, furniture, apparel, shoes, accessories, and so on.
Types of Clipping Path
Creating paths around the edges of a subject in an image can be both easy as well as difficult, depending on various factors involved in the editing process. Hence, considering the purpose of the image and the complexity of the editing, Clipping Path can be categorized into the following:
Single Layer Clipping Path
The single-layer clipping path refers to drawing vector paths on only one layer of an image. This method works best in images that have a single, hard-edged subject. This technique is usually used to remove or change the background. Hence, images of products such as bottles, books, computers, or smartphones can be used on e-commerce sites using this background removal process.
Multi-Layer Clipping Path

The multi-layer clipping path is a complex clipping path technique where the paths are drawn, creating multiple layers. This advanced technique is used when an image contains more than one subject or a product that has intricate cuts or curves.
This technique is mostly used for retouching images, such as fixing specific portions of the image, removing unwanted elements, or changing the background. Therefore, a family photo, a jewellery piece with intricate details, or group product photos are the perfect examples of this clipping path category.
Illustrator Clipping Path
The Illustrator clipping path refers to the clipping path technique of creating single or multiple vector shapes in Adobe Illustrator. This is another popular Adobe product where this method can be used to create a non-destructive path of any shape or design. To be more specific, images can be resized without compromising their resolution or quality. This clipping path technique is mostly used for creating logos or cutting out portions of an image into specific shapes for different marketing purposes.
What are the Advantages of Clipping Path?
The following are some of the key advantages of clipping paths:
- Professional quality images: Clipping Path service from experts provides seamless cutting out of subjects from the background. Such flawless and professional-quality clipping paths are essential for drawing attention to the subject as well as making the product appear high quality.
- Greater editing opportunity: The clean and precise edges of the products or subjects allow you to place them over any background of your choice. Hence, you can use them for various marketing projects.
- Cost-effective: Clipping Path service providers offer cost-effective solutions. Especially if you need a bulk quantity background removal service, then without breaking the bank, you can opt for clipping path service.
- Enhance brand image: Establishing a strong brand image is crucial in today’s competitive market. On that note, using professional-quality product photos on the website or in marketing materials helps to build customer trust, which leads to increased sales
What are the Drawbacks of Clipping Path?
Despite having an excellent ability to provide high-quality and precise cutting, Clipping Path has some drawbacks, which include:
- Require professional hands: Using the pen tool is challenging and requires professional expertise, especially when creating paths around complex shapes or curves. Hence, clipping Path services taken from a non-professional or with little expertise may not yield top-notch results.
- Time-consuming for complex shapes: Creating paths around complex subjects such as jewelry items with numerous holes, furniture with intricate details, or vehicles such as bicycles takes a lot of time compared to objects with simple and smooth edges.
- Not ideal for soft edges: Subjects possessing soft edges, such as fur, hair, leaves, smoke, feathers, flame, and so on, are hard to clip creating paths because of their delicate and thin edges. So, drawing lines around them is nearly impossible in some cases while maintaining complete accuracy.
What is Image Masking?
Image masking is a non-destructive photo editing process where a specific portion of an image can be kept hidden or exposed through masks. This technique offers more controlled editing, especially for smooth edges, complex curves, fine details, translucent objects, and so on.
Image masking can be created in Adobe Photoshop using a variety of tools and techniques, including the magic eraser tool, background eraser tool, and color separation method.
Usually, the masks applied to the images are of 3 colors, black, white, and grey. These colors represent the transparency of the changes made to the images, where the black mask keeps the area hidden, the white mask makes the areas visible, and the grey mask represents the opacity between the two or multiple layer masks.
This image editing technique is mostly used for commercial purposes, particularly for product images that have hair, fur, feathers or transparent objects such as bottles, glass, etc.
Types of Image Masking
Images contain a variety of complexities that cannot be solved using a single masking technique. Hence, to address image issues individually and provide the best outcomes, image masking has the following masking techniques:
Layer Mask
Layer mask is the basic image masking technique used for blending and micro adjustments within a layer. This technique can be used to remove the background, retouch images, and do a lot of other modifications.
In this method, the mask is created on the image and painted with white, black or grey in certain areas that need to be edited. It allows the alteration of certain parts without affecting other parts, making some parts visible, some invisible, and some partially visible.
Clipping Mask
Clipping mask is another image masking technique where the visibility of one layer is controlled or determined through another layer. It is a kind of reverse procedure when compared to the layer mask technique.
In this method, one or more layers can be created to bring out the desired visuals of an image. Usually, the clipping mask is applied on the top layer which can be a shape, text, or image. The layers underneath contain the visible content such as solid color, image, or design that will appear on the top layer.
Alpha Channel Mask
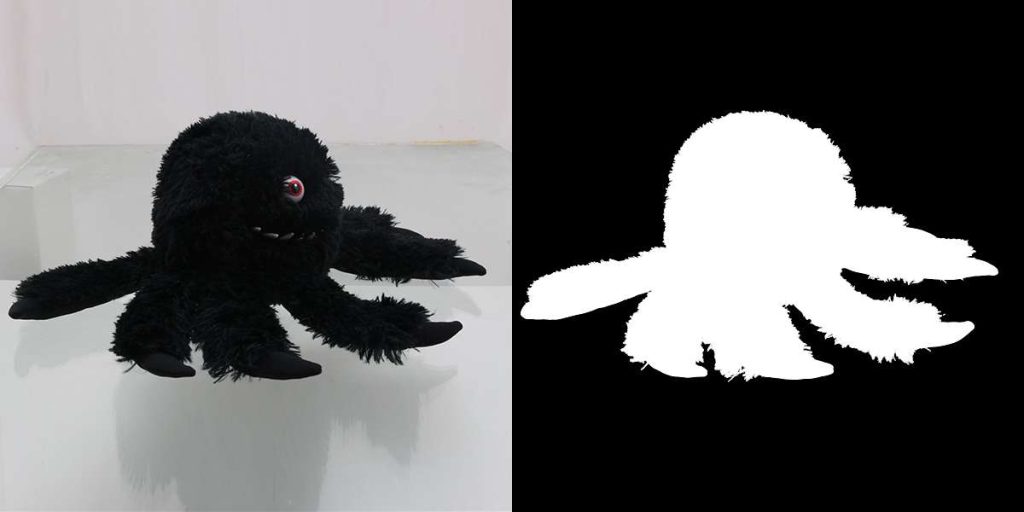
Alpha Channel mask, also known as Raster Mask, is an advanced masking technique used to separate subjects from the background that has fine edges or translucent objects, such as hair, fur, glass, or sheer fabric.
The alpha channel of an image is a greyscale band showing the dark and light areas. Hence, when the contrast level between the subject and background is sufficient, the selection of fine details and creating the mask becomes easy. The use of a few other tools, such as selection tools or dodge and burn tools, makes the mask application process more complex.
Collage Image Mask
Collage Image mask is a masking technique for combining multiple photos into one image. For that, several subjects without backgrounds are placed on a single background, and then the mask is applied to create a seamless blend between the subjects. This collage image mask is mostly used to create brochures, flyers, leaflets, and other marketing materials.
What are the Advantages of Image Masking?
The following are some of the significant advantages of image masking:
- Non-Destructive Editing: Image masking is carried out by selecting a specific portion of an image, because of which the other portion doesn’t get affected. Moreover, the edited parts are non-destructive which means the edits can be modified or reverted if needed as the original image data remains intact.
- Precise Selection and Control: Masking allows the selection of particular areas precisely compared to selection tools. Therefore, the precise cutout edges look natural and professional.
- Ideal for every type of edge: Masking can be used for any type of edge, be it hard or soft. That is why, the range of objects that can be edited is huge, making it the perfect solution for commercial use.
- Seamless blending: Retouched images or replaced backgrounds in image masking look natural and realistic for its seamless blending ability. The smooth merging of the subjects with new backgrounds gives the images a professional touch, which is crucial to attracting customers.
What are the Drawbacks of Image Masking?
As with every other masking technique, image masking has certain issues and limitations.
The following are a few of the masking image drawbacks:
- Learning curve: Image masking is a complex process. Hence, mastering it requires a steep learning curve. Apart from masking, the editor has to learn to use several other tools, which require a lot of time and practice to bring out the desired results.
- Software limitation: There are numerous photo editing software available offering image masking features. However, not all of them may provide the same result because of the limited features of the software. Some may offer advanced tools, while others require more manual effort to get the desired result.
- Expensive: Creating masks around the edges of soft edges while preserving the intricate details requires experts and careful observation. Considering the time and effort an editor has to invest in creating masks, its price is higher than the clipping path.
What are the key differences between Clipping path vs Image mask?
Although the purpose of using the clipping path and image masking is somewhat similar, their ways of implementing the techniques are different. Apart from this, there are other key differences, which include:
| Aspects | Clipping path | Image mask |
|---|---|---|
|
Type of edge |
It’s suitable for sharp or hard edges with simple curves, such as circular, square, or rectangular objects. |
It’s ideal for both hard and soft edges, such as products containing fur, hair, transparent packaging, and so on. |
|
Working Technique |
The selection tool in Photoshop, particularly pen tool is used to create lines around the edges and separate the subject from the background. |
Masks are created in layers to hide or reveal a particular portion of an image without affecting the original image data. |
|
Modification |
After creating paths and cutting off the elements, returning to the previous position is not possible. |
Future adjustments to the original image is possible as this method is non-destructive. |
|
Price |
The cost of the clipping path is comparatively lower than image masking. |
The cost of image masking is higher as it is a complex editing process compared to the clipping path. |
When is it best to use a clipping path or image mask?
Clipping Path and Image Mask are both popular photo editing techniques for commercial use. However, the best use of clipping path and image mask depends on the type of object you want to work with and the level of complexity of the editing process.
When to use Clipping Path?
- If the edges of the object or product are well-defined
- If you need a clean cut-out of the subjects from the background
- If your budget is low and have a bulk of similar editing needs
When to use Image Mask?
- If the edges have fine details, complex shapes, or curves
- If your image contains transparent objects such as water, glass, smoke, etc.
- If you have a higher budget
Clipping Path vs. Image Masking: What's better for background removal?
Clipping path vs Image mask is a common debate when it comes to removing background. Although both of them are excellent for background removal, they have some advantages and limitations.
Every product image has individual editing needs. As you know, a clean or white background makes a product look professional and appealing to customers. Hence, your focus should be on presenting your product images that have clean and natural-looking edges.
If your product has straightforward edges, such as simple lines, or a basic structure, such as square, rectangle, or circular forms with little or easy curves, the clipping path would be the better background removal technique for you. However, if your products are fur coats, shoes with furry details, or models with messy hair, then image masking would be the better technique.
Frequently Asked Questions(FAQ)
What's the purpose of clipping path and clipping mask?
The purpose of clipping path and clipping mask is the same, which is to separate a certain portion of an image from the background. However, clipping path yields the result by creating clips and clipping mask gives the results by hiding or revealing certain portions through layers.
What's the cost variation between clipping path and masking?
The cost of clipping path and masking varies depending on the level of complexity and time required to bring out the desired result. Usually, clipping path cost starts at around $0.25 and for image masking you may expect the initial price to be around $1.19.
Can I use both clipping path and clipping mask in the same project?
Yes, if your product image contains both soft and hard edges, then you can use the clipping path and clipping mask techniques in the same project for the best outcomes.
Which technique is more time-consuming - clipping path or image masking?
When comparing the time required to edit images using clipping path and image masking, masking is more time-consuming as it is used for complex objects and shapes.
Conclusion
Clipping Path and Image Masking are both essential photo editing techniques. As one technique is never enough to solve every type of issue present in images, both of them have significant contributions to fulfilling the needs and demands of the e-commerce industry.
So far, we have discussed everything you need to know about the clipping path and image masking technique, ranging from their types, uses, purposes, and key differences.
Hopefully, now you can decide which of these techniques would yield better results for your business needs and overcome the Clipping Path vs Image Mask battle.
Best of luck for your future projects!