28 Feb How Big Is a 4×6 Photo? Exact Size in Pixels to Inches
How big is a 4×6 photo? Struggling to match your digital photos to standard 4×6 prints?
Photographers know that size mismatches can lead to unhappy clients. This guide breaks down 4×6 photo dimensions, aspect ratio, and ideal resolution, giving you a step-by-step solution to streamline your workflow and deliver perfect prints every time.
What Exactly is a 4×6 Photo?
A 4×6 photo is a standard print size that measures 4 inches by 6 inches and follows a 3:2 aspect ratio. It is the most commonly used photo print size for everyday photography, albums, and photo labs. Also, this ratio matches most professional cameras, so photos usually print without cropping.
However, it looks in real life as –
- Size of a postcard
- Small enough to hold in your hand and
- Large enough to clearly see details and faces.
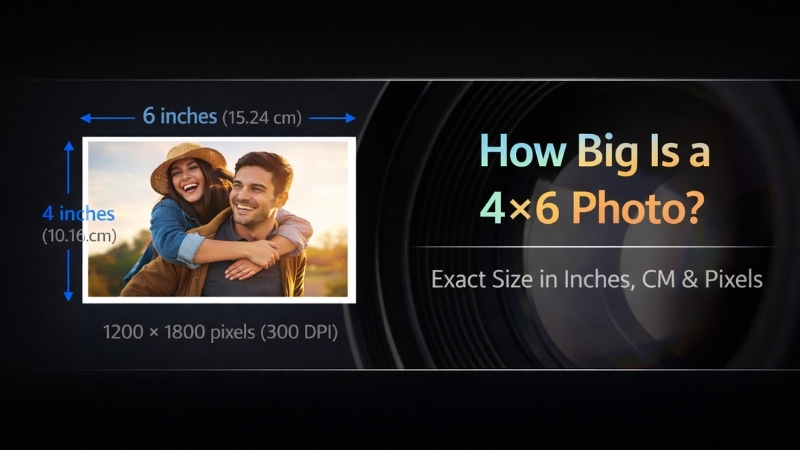
What is a 4×6 Photo Size in Inches
A 4×6 photo measures exactly: 4 inches x 6 inches.
The size stays the same, but the orientation can change:
- Portrait: 4 inches (width) × 6 inches (height)
- Landscape: 6 inches (width) × 4 inches (height)
This is the most common standard photo print size used worldwide for everyday prints, albums, and professional photo labs.
What is the 4×6 Photo Size in CM, MM & Feet?
The conversion of a 4×6 photo size into different measurement units is as follows:
First, let’s convert inches to CM units:
1 inch = 2.54 cm
1 inch = 25.4 mm
1 inch = 0.083 ft
Based on these conversions, a 4×6 photo equals:
10.16 × 15.24 cm
101.6 × 152.4 mm
0.33 x 0.5 ft
Note: Some photo labs and paper packaging may count a rounded measurement, like 4×6 as 10×15 cm, as a simplified format.
What is the Pixel Size of a 4×6 Photo?
The pixel size of a 4×6 photo depends on the print resolution (DPI – dots per inch) you choose. The higher the DPI, the sharper the print. Below, we’ve showcased 4×6 pixel dimensions by resolution:
| Print Quality | DPI | Pixel Size | Best for |
|---|---|---|---|
|
High quality (professional grade) |
300 DPI |
1200×1800 pixels |
Photo labs, albums, and client prints |
|
Good quality |
240 DPI |
960×1440 pixels |
Casual prints |
|
Basic quality |
150 DPI |
600×900 pixels |
Draft or low-detail prints |
Note: 300 DPI (1200×1800 pixels) is the industry standard for sharp, professional 4×6 prints.
However, most modern smartphones capture images between 12MP and 48MP, which is ideal for high-quality 4×6 printing. But when you download images from social platforms like Instagram may be compressed, reducing print quality.
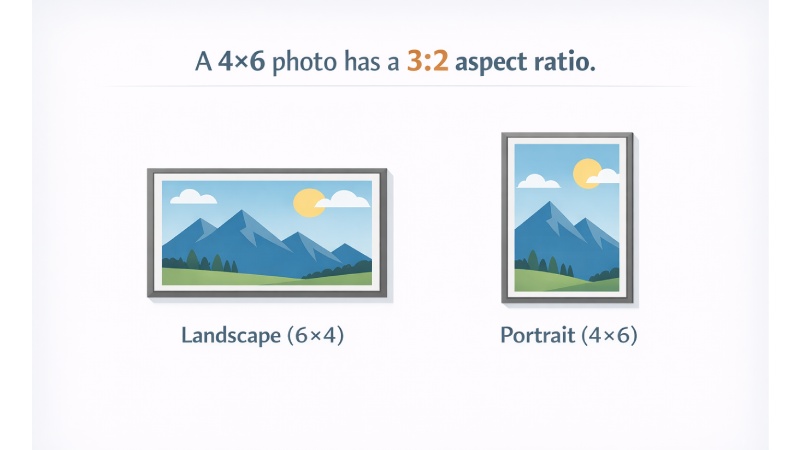
What is the Aspect Ratio of 4×6 Photo?
The aspect ratio of a 4×6 photo is 3:2. That means for every 3 units of width, there are 2 units of height (or vice versa, depending on orientation). However, the ratio stays the same whether the photo is:
- Landscape: 6 (width) × 4 (height)
- Portrait: 4 (width) × 6 (height)
Most DSLR and mirrorless cameras from brands like Canon, Nikon, and Sony naturally shoot in a 3:2 aspect ratio. And this is one of the major reasons 4×6 became the standard print size. For more details, check out the next section.
Why are 4×6 Photos Standard?
4×6 photos are the industry standard because they perfectly match the 3:2 aspect ratio of traditional film and most modern DSLRs, best for full-frame printing without cropping.
Here are key reasons why 4×6 is the popular & standard:
- Cost-effective and accessible: 4×6 prints are the most affordable option, supported by all photofinishing labs and home printers.
- Convenience and portability: The size is small enough to fit into standard photo albums, wallets, and small frames, making it ideal for storage.
- Industry standard: The print size is best for film developing, creating a long-standing, cultural norm.
Comparing 4×6 with Other Photo Sizes
Choosing the right print size affects composition, cost, and visual impact. Below, we’ve highlighted a comparison table between 4×6 and other popular standard photo sizes:
| Size (inches) | Aspect Ratio | Cropping | Print cost | Visibility |
|---|---|---|---|---|
|
4×6 inches |
3:2 |
No cropping |
Low |
Low |
|
5×7 inches |
7:5 |
Some cropping |
Moderate |
Low-Medium |
|
8×10 inches |
5:4 |
More cropping |
Moderate |
Medium |
|
11×14 inches |
14:11 |
More cropping |
Higher |
Medium-high |
|
16×20 inches |
5:4 |
Some cropping |
Higher |
High |
4×6 vs 5×7: Impact Difference
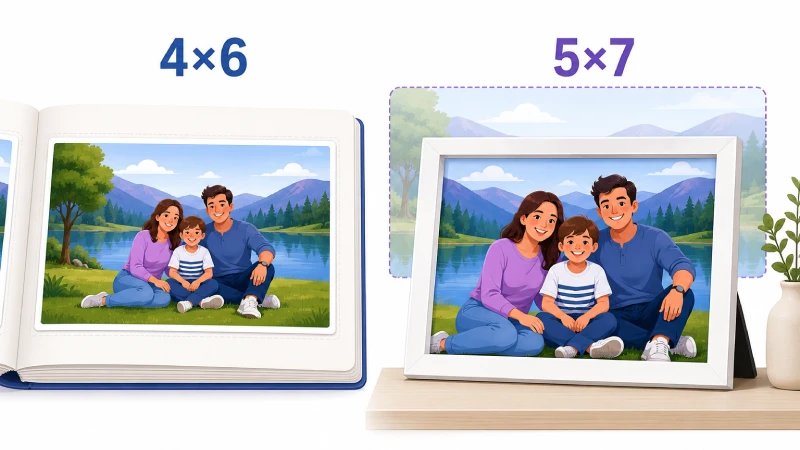
Key difference: Aspect Ratio
- 4×6 photo uses 3:2, a standard camera ratio.
- 5×7 photo uses 7:5, which often requires cropping.
When to choose:
- 4×6 is best for albums, budget printing, and everyday memories.
- 5×7 is best for gifting, larger frame display, and portrait-focused prints.
4×6 vs 8×10: Impact Difference
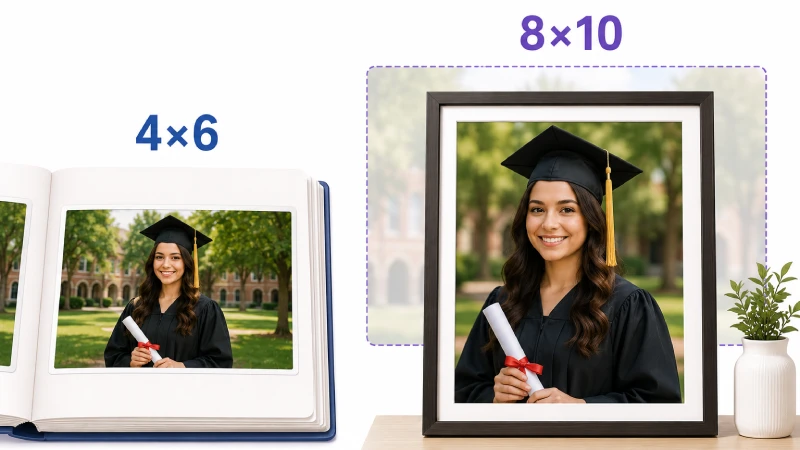
Key difference: Visual presence
8×10 photo is more suitable for professional portraits and wall decor.
When to choose:
- 4×6 is best when you want zero cropping and affordable bulk prints.
- 8×10 is best when you want framed wall art, graduation photo, professional headshot, and a formal portrait.
4×6 vs 11×14: Impact Difference
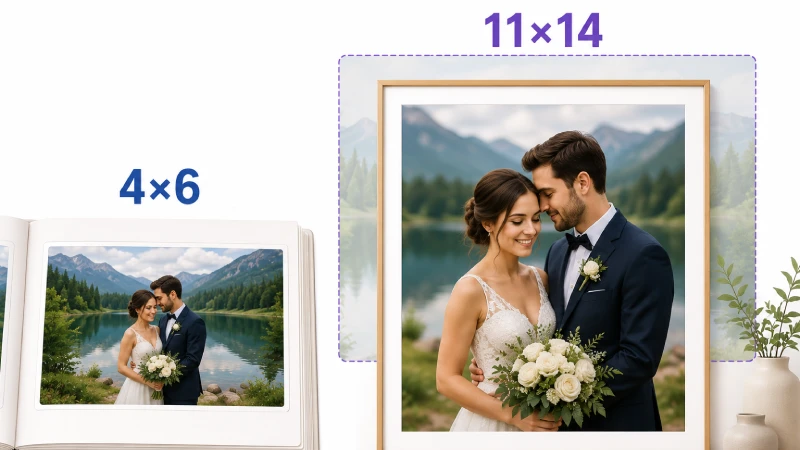
Key difference: Professional display quality
11×14 requires cropping and works best for curated portraits.
When to choose:
- Choose 4×6 for casual moments.
- Choose 11×14 for wedding portraits, gallery walls, landscape photos, and professional studio prints.
4×6 vs 16×20: Impact Difference
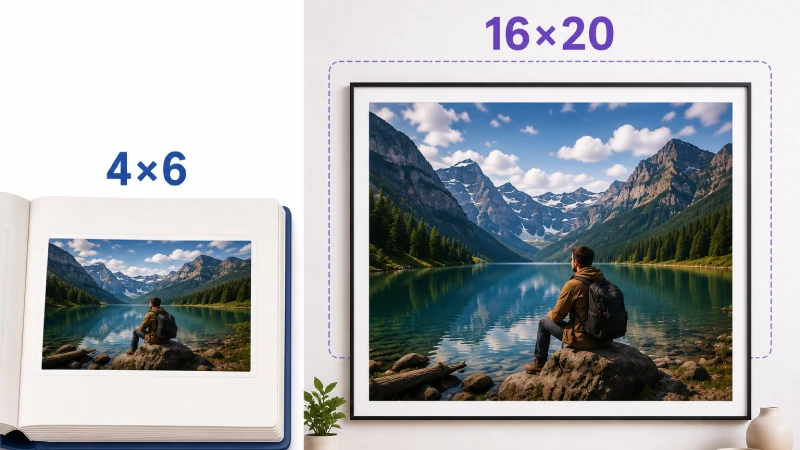
Key difference: Strong visual presence
16×20 is a large-format print.
When to choose:
- 4×6 is best for easy storage.
- 16×20 is best for fine art prints, living room wall displays, and photography exhibitions.
Common Uses of 4×6 Photos
4×6 photos are the standard, popular, and cost-effective size for everyday photography. Its 3:2 aspect ratio matches most digital camera sensors and smartphone photos, allowing for printing without significant cropping.
Common uses of 4×6 photos are as follows:
- Family & everyday memory prints: 4×6 is compact, affordable, and perfect for preserving timeless family memories and daily life moments. They are available in sizes to hold 100 to more than 500 photos.
- Photo albums & scrapbooks: Most traditional albums are designed for 4×6 prints. The size balances visibility and space efficiency. If you’re looking for styling inspiration, explore portrait photography ideas that print beautifully in 4×6 to ensure your album pages look professionally curated.
- Postcards & direct mail marketing: 4×6 is the standard postcard size and affordable for bulk printing and mailing. Suppose a local restaurant launches a discount campaign and mails 4×6 promotional postcards with food photography and a QR code for online orders.
- Desk frames & personal displays: They fit perfectly on office desks, bedside tables, and small shelves without taking up too much space and serve as a source of motivation in a workstation.
- Event proof prints for clients: Professional photographers often deliver 4×6 proof prints before finalizing large projects.
- Product photography & catalog inserts: Fashion and eCommerce brands use 4×6 prints for packaging or physical catalogs.
- Small business branding & promotions: Small businesses use 4×6 prints for thank-you cards, promotional inserts, and mini lookbooks.
How to Print a Perfect 4×6 Photo
To print a perfect 4×6 photo, use high-quality photo paper, set your printer to the highest quality, and ensure your image is at least 1200×1800 pixels (300PPI). Here are the key requirements to print a perfect 4×6 photo:
Start with the right image size
For a sharp 4×6 print, your image should be:
- Aspect Ratio: 3:2
- Resolution: 1200 × 1800 pixels minimum
- DPI: 300 DPI (for professional-quality output)
If your image isn’t 3:2, crop it before printing to avoid unexpected trimming.
Crop carefully (don’t rely on auto-crop)
Many printing apps automatically “zoom to fill,” which may cut off important parts of the image, such as –
- Manually adjust crop
- Keep faces and text away from edges
- Maintain balanced composition
Adjust brightness for print
Screens are backlit, but prints are not. That means photos often print slightly darker. So, it’s best to increase:
- Brightness slightly (+5 to +10%) and
- Midtones gently
This small tweak can make a noticeable difference in the final result.
Correct colors before printing
Color shifts are common in printing. So, ensure –
- White balance is accurate
- Skin tones look natural
- Shadows aren’t overly blue or muddy
That’s why professional photographers use popular brands like Canon or Sony to get fine-tune white balance before sending images to print.
Choose the right paper finish
Your paper choice affects the final look:
- Glossy: Vibrant colors, high contrast
- Matte: Soft, less glare
- Luster/Satin: Professional balance
For portraits, many prefer luster. For vibrant travel shots, glossy works well.
Use high-quality photo paper (if printing at home)
Set printer settings to:
- Paper size: 4×6
- Quality: High / Best
- Disable “Fit to Page” if it distorts ratio
Always preview before printing
To ensure printing quality, check out some factors like:
- Check crop
- Confirm orientation (portrait or landscape)
- Review margins and
- Double-check resolution
Tips: The top 4×6 photo printers in 2026 are Liene Amber M110, Canon SELPHY CP1500, and Epson EcoTank ET-8550. |
If you’re printing from social media platforms like Instagram or Facebook, use the original high-resolution file instead of the compressed download.
Common Mistakes to Avoid
1. Ignoring the 3:2 Aspect Ratio: If your image is square (1:1) or a vertical social media format, it may get cropped. Photos downloaded from platforms like Instagram are usually square or 4:5, which don’t perfectly match 4×6.
The result: Key elements of the image, such as heads or hands, get cropped off, or the image is stretched, making subjects look distorted (tall and skinny or short and fat).
How to Avoid: Adjusting composition manually instead of using auto-crop, and checking your crop before printing.
2. Printing Low-Resolution Images: Blurry prints are one of the biggest complaints. For sharp 4×6 prints, your image should be at least: 1200 × 1800 pixels (300 DPI).
The result: Grainy, pixelated, or blurry prints.
How to Avoid: Use high-quality original photos. For a high-quality 4×6 print, aim for at least 300 DPI (dots per inch), which means an image size of roughly 1200 x 1800 pixels.
3. Ignoring the “Bleed” Area: Placing essential, critical details (text, faces) too close to the edge of the photo frame.
The result: The printer may cut off important details during the trimming process.
How to Avoid: Keep important subjects away from the extreme edges, allowing a small margin of error (roughly 1/8 inch).
4. Poor Lighting and Color Management: Printing photos that are too dark, have low contrast, or using auto-enhance features that oversaturate skin tones.
The result: Dull, flat, or artificial-looking prints that don’t match what you saw on your screen.
How to Avoid: Brighten dark photos before printing, ensuring colors look natural.
5. Using the Wrong Paper or Finish: Using standard office paper or choosing the wrong finish for the display environment.
The result: Faded colors or excessive glare.
How to Avoid: Use proper 4×6 glossy, matte, or luster photo paper. Glossy is best for albums, while matte works better to reduce glare for framed, wall-mounted photos.
6. Mismanaging Printer Settings: Printing with default settings, using improper scaling (e.g., “Fit to Page” instead of “Actual Size”), or failing to set the printer to “borderless”.
The result: White, unwanted margins around the photo or incorrect sizing.
How to Avoid: Select “4×6” or “4×6 Borderless” in your print settings to ensure the image fills the paper correctly.
Quick checklist before printing 4×6:
- Is the image a 3:2 ratio?
- Is the resolution at least 1200×1800 pixels?
- Have you reviewed the crop preview?
- Is the paper finish selected correctly?
- Are important details away from the edges?
Now that you have a proper idea of the 4×6 common mistakes, let’s check out when you can use this photo size and when you should avoid it from the next section.
When Should You Choose 4×6 and When Not?
A 4×6 photo is the standard size for photography because it matches the 3:2 aspect ratio (supports most DSLR/mirrorless cameras) and 35mm film. However, choosing the 4×6 size depends on how you plan to display your images or the device you used to capture them.
Here’s a guide on when to choose the size and when not:
You should choose a 4×6 photo size:
- Photo Albums and Scrapbooks: 4×6 is best for standard photo albums.
- Budget-Friendly Bulk Printing: 4×6 prints are a cost-effective option, making them ideal for printing hundreds of event or other photography niche photos.
- Casual Everyday Snapshots: Perfect for candid moments, family gatherings, and everyday photos.
- Small Frames and Displays: 4×6 is ideal for desks, bookshelves, or small wall nooks.
- Postcards and Invitations: The 4×6 size is frequently used for personalized, homemade invitations, thank-you cards, or holiday cards.
- Photo Collages/Garlands: The size is best for creating photo collages or hanging with clips.
You should not use a 4×6 photo size:
- Large Wall Displays: A 4×6 is too small for a main, indoor wall piece. Use 8×10, 11×14, or larger for wall galleries.
- Detailed Landscapes/Scenery: A 4×6 is often too small to showcase the detail in wide landscapes, cityscapes, or nature scenes.
- Large Group Portraits: In a large group photo or detailed group shots, faces may look too small on a 4×6 print. A 5×7 or 8×10 is better for seeing the detail.
- When Shooting on a Smartphone (Default 4:3 or 16:9): If your phone is set to 4:3 or 16:9, a 4×6 print will require cropping, which might cut off important details.
- Professional Portfolios: For professional presentations or art galleries, 4×6 is seen as a “snapshot” size. Professionals typically opt for larger A4 or 11×17 prints to showcase detail and quality.
Frequently Asked Questions About 4x6 Photo
What are the best camera sensors for taking 4x6 photos?
The best camera sensors for taking 4x6 photos are those with a 3:2 aspect ratio, which matches the standard 4x6 print format and allows edge-to-edge printing without cropping.
What resolution is best for printing 4x6?
The best resolution for printing a high-quality 4x6-inch photo is 300 DPI (dots per inch), which corresponds to an image size of 1200x1800 pixels.
Can I enlarge a 4x6 photo to 8x12?
Yes, you can enlarge a 4x6 photo to 8x12, as they share the same 2:3 aspect ratio, which means no cropping is required to fill the new frame.
Is 4x6 good for professional photography?
Yes, of course. 4x6 is good for event delivery prints, client previews, portfolios, and even premium or wall art displays, which are preferred.
Why does my 4x6 print look cropped?
Your 4x6 print looks cropped for two reasons: (1) the photo isn’t in a 3:2 ratio, and (2) “Fill frame” or “Zoom to fill” is enabled during printing.
Conclusion
Now that you know exactly how big a 4×6 photo is and how to prepare your images for printing, you can avoid cropping mistakes and achieve professional results. Whether you’re printing for clients, albums, or gifts, these tips ensure your photos always look their best. Grab your camera, prep your files, and start printing with confidence today!