

- May 20, 2023
- by Joanna Silva
- Tips
Are you struggling to make your product photos stand out from the crowd? Consider incorporating shadows into your compositions. By employing the right techniques, you can create shadows that add a sense of realism and professionalism to your images, helping your products to look their very best.
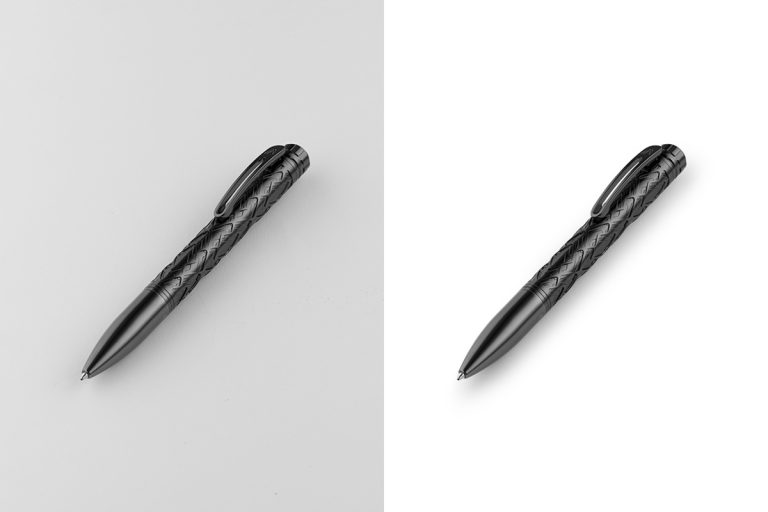
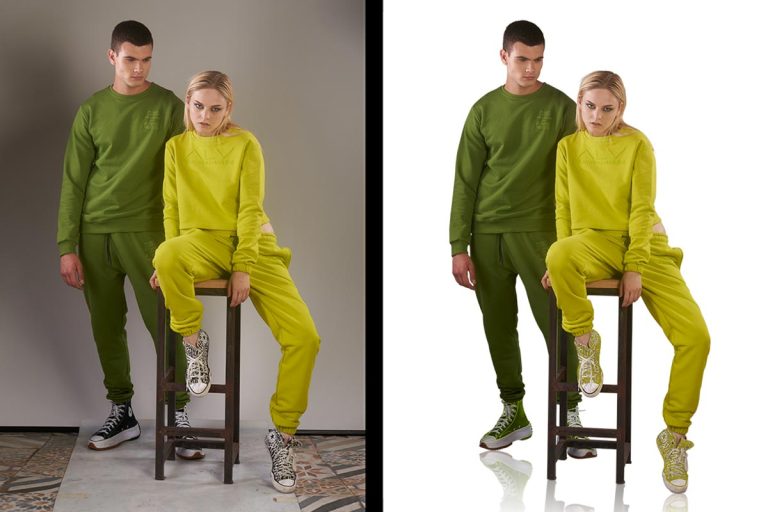
The utilization of shadow in product image editing can prove to be advantageous. Incorporating authentic shadows that appear to be cast by the product bestows it with a sense of depth, elevating its overall appeal.
You can make e-commerce photos look better by adding natural shadow effects with a computer program called Photoshop. Sometimes taking pictures with the correct shadows is hard, but natural shadows look the best. It’s essential to keep the natural shadows when you take pictures of things you want to sell.
However, today we will create shadows to images step by step. So, stay with us to learn the steps so that you can also make your images more professional for your online store.
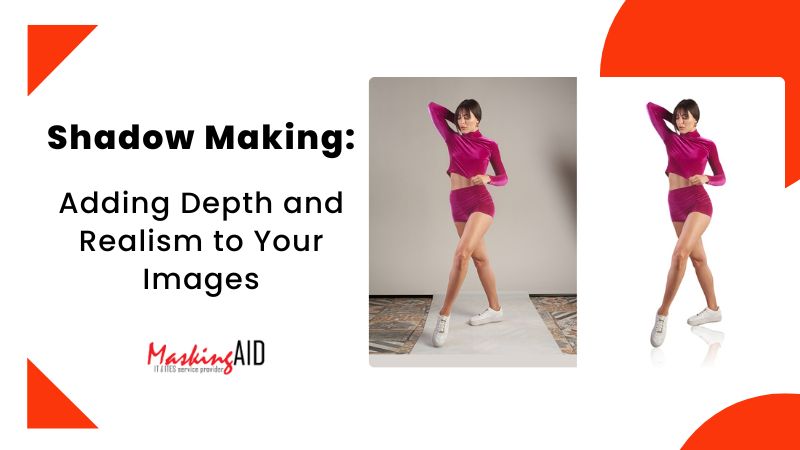
Shadow Making: Adding Depth and Realism to Your Images
Shadow making services make your product photo look better and more enjoyable if it is done correctly by professional hand. You can create shadows using the sun or by editing the picture later. Realistic shadows make your product look better and more professional. When photographing your toy, adding a shadow can make it look more natural and exciting. Shadow-making services can help you to do this without any problems.
Types of Realistic Shadows:
For online stores, it’s essential to take care of all the details. Even things like making shadows look real can help your store do well. You can add three different kinds of shadows to make them look better. They are –
1. Natural Shadow
2. Drop Shadow

3. Reflection Shadow
Today, we will discuss the Photoshop drop shadow effect in detail. Also, you will get tutorials on how to add drop shadow effects to your images from this article.
How to make shadow in Photoshop ?
Drop shadow is when you make an image look like it’s being reflected underneath itself. It makes the picture look like it’s popping off the page and can change how it looks. A drop shadow is when you make a shadow behind something to make it look like it’s popping out more.
Adding a special effect called drop shadow can make something look polished and professional. It might seem hard and take a long time to learn, but practicing with patience and interest can make you good at it.
But the question is how to create shadow effects in Photoshop. Well, the process given below is the answer to this question.
Let’s learn the process of shadow making: adding depth and realism to your images in detail below.
Step-1: Distinguish your target object from the background.
Choose the photo to which you wish to apply a shadow. Activate your layer palettes. From where you were, create a new file, then Window, and finally, the said layer. Remove the desired object from the main photo. Replace the image with a new white layer.
To avoid misunderstanding with different layers when you construct your shadows, rename your original file as an isolated or removed background.
Click the eye icon next to the background layer to make it invisible. At this point, your object is only visible against a transparent background.
Step-2: Make a Standout Background for Your Accessible Object.
Select your hidden background layer from the layers palette. To add a new layer, go to layer>New layer, or press shift+ control + N. This newly produced layer will now serve as your unique background. Fill the new layer with a color (by selecting Edit>Fill). If you need to add a custom color, select a custom brightness from the DropDown Menu.
Step-3: Color of Your Cast Shadows Resolution.
Shadows can take on a variety of colors. Choose the form shadow and customize the hue of your thrown shadow. The shape shadow must then be considered in your item. Use the Eyedropper Tool to choose the form shadow. After you select the form shadow, it will become your foreground color.
To get the foreground color box, click on the new foreground twice. Make changes to the color of your cast shadow. Change the brightness (i.e., make it darker or more saturated by shifting the color field). When finished, click OK.
Step-4: Using Photoshop to Create a Drop Shadow.
Choose a different object layer.
At the bottom of the layer palette, select the “fx” option. Then, in the dialogue box, select the drop shadow. Set the shadow color to the same as the foreground color (using the Drop shadow dialog box). The distance, blurriness, spread, and size levels aren’t that important right now because you can change them later.
However, the settings in the snapshot below can be used as a starting point. When you’re satisfied with your Drop shadow creation, click OK.
Step-5: Make a Layer Out of Your Drop Shadow.
Go to layer>Layer genre >Add layer to isolate your drop shadow from its layer. As a result, you can alter the object’s shadow.
Step-6: Adjusting Realistic Drop Shadow Color.
In the layers palette, select the newly added drop shadow layer. To draw drop shadows beneath the floor, go to Edit>Change> Color. You can change how a shadow looks by changing the thing that’s making the shadow or by changing the shape of the shadow. You can make the shadow look more like the thing that’s making it.
You can change your shadow layer’s “adjusting mode” to “Normal.” This will also assist your shadow layer in getting the “Fill” to 100%. Choose the area of your shadow that needs to be changed. Utilize “Rectangular Marquee software.”
Now To adjust a specific region of the shadow, use Edit, change, and Distort/pervert. Once you’ve satisfied your transformation, use your Eraser and Paintbrush to solve any sides of your shadows. Increase the layer blend option of the existing shadow layer. Reduce the “Fill” value to 75%.
Step-7: Add an Alpha-channel.
The shadow looks good now, but it might get lighter and blurrier. We can use an alpha channel to make the shadow brighter and blurrier in certain areas to fix this.
To add an alpha channel, go to Window>Channels. “Channel Palette” should now be open. Click on the palette table to select a new channel. To create a shadow, add an alpha channel.
Create a new channel dialogue box and rename ‘Alpha -1’. You must ensure that the specified area radio button is selected under the indicated brightness.
Step-8: Include a Gradient in Your Alpha Channel.
Simply choose the Alpha-1 channel in your channel palette as you would a layer. To use the full modes, make sure the look is turned on. Now, from the palette, select the gradient software. Make the background white and the front ground black. When you feel the slope setting is delicate, click on the outer layer of your shadow.
Draw the slope or gradient to the specific area of your shadow near the object or thing. The selection is now complete with a red gradient that overlays your image.
Step-9: Blur Selection.
When you add a gradient to your alpha channel, a red gradient appears on top of your photo, demonstrating how the mask within the channel interacts with your photo. To make the red gradient invisible, toggle the icon next to Alpha 1.
Click the Top channel in your channel to pick your color channels and de-select your alpha channel. Make sure your drop shadow layer is selected in the layers palette. Navigate to Filter>Blur>Lens Blur. Please check the box.
From the source drop-down menu, select Alpha 1 under the depth map. Set the Blur Focal Distance to 0 and check the box next to Invert. Please select OK to leave the various values at their default settings.
Step-10: Add a Layer Mask.
Go to Select>Load selection. You’ll get a dialogue box that gives you much control over your blur setting. Make sure you test the radio option and choose Alpha-1. If done, Press ok. You can now locate the darkest portion of the gradient or slope you created in the alpha channel.
By typing Shift + Control + I or Choose inverse by going to Select> select inverse. Finally, in your layers palette, select the Layer Mask option.
When using the mask, the shadow will appear to “fade” as it retreats the distance. You must ensure the shadow is behind the object to make it look good. You can fix this by making a new layer and using a brush to paint in the shadows on top of the object. You can adjust the settings to make it look natural.
Frequently Asked Questions(FAQ)
In Photoshop, how can you change the color of a drop shadow?
Select the Shadows option from the left side of the dialog box after double-clicking on your layer thumbnail or layer style icon. A colorful box is next to the Blend Mode choice at the top of the shadow settings. Click this colored box to open the palette and select a new drop shadow color.
When it comes to opacity, you can adjust the transparency of the shadow by turning it up or down. The water drop shadow will be completely invisible at 0% opacity and completely visible at 100% opacity. To create a delicate shadow, lower the opacity to soften the intensity of the shadow quickly.
What separates a cast shadow from a drop shadow?
Applying a drop shadow to an item is more straightforward and less gratifying than casting a natural shadow. Drop shadows are about the same size and shape as the object. You wouldn’t frequently see a shadow in the actual world that resembled an unaltered drop shadow. To make your shadow realistic, you must use the above-described technique to transform it into a three-dimensional cast shadow.
In Photoshop, can I isolate a drop shadow from a layer?
Yes, you can remove drop shadows from layers and display them on their Layer. Go to the Layers menu. Select Create Layer from the Layer Style drop-down menu. Your drop shadow is no longer connected. Instead, it is a separate layer beneath the original.
Conclusion:
After learning the way of making shadows written above, you can add depth and realism to your images, which will be very helpful for your e-commerce business. It’s crucial to understand the procedures of shadow-making if you’re a designer or simply learning the fundamentals of Photoshop. This will help you give your photographs more depth and reality.
But unless you speak with experts, you won’t be able to produce the best drop shadow effect in Photoshop. You can create the appearance that an image is raised above or below where it would normally be placed by including a drop shadow. In writing this post, we aimed to teach you how to create shadows in Photoshop.
However, hopefully, this article about shadow making: adding depth and realism to your images, will help you to grow your online business by making your product images more professional and cool.